SSL with Raspberry PI and docker


In a previous blog I wrote about setting up rails with docker on a raspberry pi. In this blog I will describe how to make that web app publicly accessible through a url that is not an ip address with a port.
Make sure you have the following setup:
Your server running on a raspberry pi that you can access
A custom domain or publicly accessible ip address
Access to your router
Why SSL?
Originally, data on the Web was transmitted in plaintext that anyone could read if they intercepted the message. For example, if a consumer visited a shopping website, placed an order, and entered their credit card number on the website, that credit card number would travel across the Internet unconcealed.
SSL was created to correct this problem and protect user privacy. By encrypting any data that goes between a user and a web server, SSL ensures that anyone who intercepts the data can only see a scrambled mess of characters. The consumer's credit card number is now safe, only visible to the shopping website where they entered it.
SSL also stops certain kinds of cyber attacks: It authenticates web servers, which is important because attackers will often try to set up fake websites to trick users and steal data. It also prevents attackers from tampering with data in transit, like a tamper-proof seal on a medicine container.
High level overview
Below is a flow chart showing what steps the request is making to finally get to the web server.
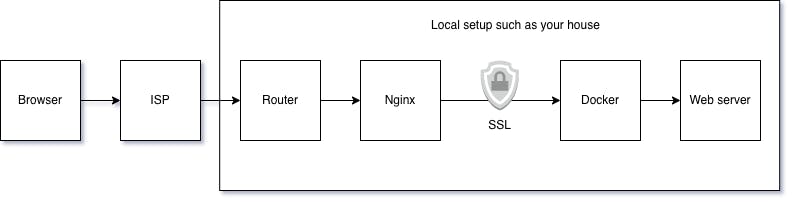
As you can see there's quite a number of steps the request makes, and this is without any load balancers or other services you might see in an environment where more scaling is required. Here are some of the steps explained.
The request starts with input from a browser typing in a url like yourdomain.com. For simplicity's sake we'll skip dns and other steps that won't concern us.
The domain needs to resolve to some ip address which is in our case our public ip address, hence the ISP step.
The request then moves to your router. You'll need to export those ports and route them to your Nginx server.
port 80 for http
port 443 for https
This is the port that is used for secure connections like the one we're trying to setup.
From Nginx we'll route the request to the docker image thats up and running.
Docker will finally route the request to the actual web server running inside of it
As you can see there's lots of dots to connect, so lets get started and connect them.
Custom domain to your router
If you don't have a domain of your own you can register one at one of the many providers like google domains or namecheap.
First lets get the public ip address from https://www.whatismyip.com/
Copy the ip address listed
In your domain dns settings create an A record with the subdomain you want to use (or leave it empty) and as its value use the ip public ip address
Set the TTL to as low as possible to get it up and running as soon as possible. You can change this later to something longer.
Now your domain will try and resolve your public ip address, but there's nowhere to go from there. The router doesn't know what to do with the request and will return an error page in your browser.
Router to Nginx
To enable incoming traffic you'll need to enable access to your router. This differs per router, but usually requires you to enable Virtual server or Port forwarding. This guide is pretty comprehensive on the different types of routers available and explains how to turn on port forwarding.
To forward the request to the right service we need to have Nginx running on the raspberry pi and know the ip address of the device as well.
Why nginx?
Nginx is a Node.js based web server that can help us serve the secure https connection using ssl certificates.
Nginx will route web traffic to the appropriate container for the domain name of the request. This kind of setup for routing web traffic is called a reverse-proxy.
Installing nginx on raspberry pi
To install nginx run the following command on the raspberry pi
sudo apt-get install nginx
To validate the installation was successful run
service nginx status
And that should get you a message detailing the status of nginx.
SSL Certificates on Raspberry pi
Now that Nginx is installed we need to create ssl certificates in order to serve a secure connection. For that we will use certbot through Let's Encrypt.
Lets start by installing certbot.
sudo apt install certbot
Now lets create the ssl certificate. Make sure your port 80 is open and forwarded to your (and replace yourdomain.com with your actual domain).
sudo certbot certonly --standalone -d yourdomain.com -d www.youromain.com
After running these commands, you will be prompted to enter some details, such as your email address. These details are required for Let’s Encrypt to keep track of the certificates it provides and also allow them to contact you if there are issues with the certificate.
If you are using Cloudflare as your DNS provider, ensure that you have the DNS currently set to bypass the proxy servers.
Configure Nginx to use SSL
The next step is to have Nginx actually use the SSL certificate we just created.
Begin by opening your NGINX configuration file called nginx.conf. These are typically stored in /etc/nginx/ or /etc/nginx/sites-available/
Open up the config file with an editor like vim or nano and update it to the following:
http {
  server {
    listen 80 default_server;
    listen [::]:80 default_server;
    listen 443 ssl;
    root /usr/share/nginx/html;
    index index.html index.htm;
    server_name yourcomain.com;

    ssl_certificate /etc/letsencrypt/live/yourdomain.com/fullchain.pem;
    ssl_certificate_key /etc/letsencrypt/live/yourcomain.com/privkey.pem;

    location / {
      proxy_pass http://localhost:3000; # 3000 is the port the Docker container is running on
      proxy_set_header X-Forwarded-Server $host;
      proxy_set_header Host $http_host;
      proxy_set_header X-Real-IP $remote_addr;
      proxy_set_header X-Forwarded-For $proxy_add_x_forwarded_for;
      proxy_set_header X-Forwarded-Proto https;
    }
  }
}
A couple things explained:
listen 443 sslmeans that nginx will listen to the port 443 which is used for https. Its currently also listening to port 80 which is http. You can add a redirect that redirects to 443. Read more on how to do that here.ssl_certificateandssl_certificate_keytell Nginx where to find the information for SSL. You can cd to that directory and confirm that the files are present.
The fullchain contains all the information needed to talk with the server over the HTTPS connection. It also contains the information needed to verify it is a legitimately signed SSL file.
The private key secures the actual connection. Only your server can read and see this file, and this file should be kept secure otherwise, people could potentially intercept and decrypt your traffic.locationproxy_passredirects traffic as a reverse proxy to our actual webserver running in dockerproxy_set_headersets the headers that is passed on to the webserver.
In my case I had some issues where the puma rails server was refusing to serve requests due to a mismatch in request protocol:
HTTP parse error, malformed request: #<Puma::HttpParserError: Invalid HTTP format, parsing fails. Are you trying to open an SSL connection to a non-SSL Puma?
These headers will fix that. Specifically this header:
proxy_set_header X-Forwarded-Proto https;
After you edit and save the config file restart Nginx by running the following:
sudo systemctl restart nginx
After this you should be able to navigate to your custom domain with https and get a secure connection to your app running in docker on your raspberry pi!